 I wish I’d got to know mustard greens (and reds and goldens) much earlier in my growing adventure. They are such a tasty, versatile and good-hearted vegetable. And some of the varieties are great green manures, ground cover and biofumigants.
Here at Legge Towers we sow them in mid to late summer so that we can put them in the polytunnel to over winter. They get cut down by frost outside in winter, but in the polytunnel, sometimes with a little extra fleece protection they do fine.
They make a good quick green manure which may survive a kind winter, but you can also re-sow early in spring. Certain varieties (like Caliente) are good before potatoes as the gases given off by the leaves when cut down can help prevent wire worm and other pests – this is the biofumigant. You need to cut down and work in the leaves quickly though. More info on this here.
Just to say, we don’t tend to use them in the spring and summer. This is because there’s plenty else around and because we find they bolt quickly if it gets hot or dry for long (it does occasionally happen).
The mustards give us with little leaves for salads to start with. Then we get bigger leaves to use in stir fries or as a steamed/wilted veg. You can also make a lovely mustardy pesto with them. In the spring they produce wonderful flower shoots to use like sprouting broccoli.
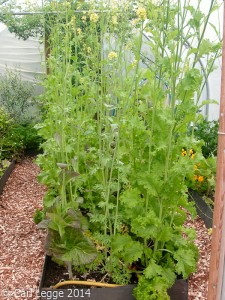
 Then, as you can see they climb!
By this time, I’m thinking of the next crop that will occupy the space for the summer months. This year, I didn’t want to just compost the remains (after shredding the woodier parts). I thought I could use the more tender parts to ferment to make a tasty snack and accompaniment.
And did that work well? Oh yes. Read on to find out more.
Fermented mustard greens recipe
I picked off the top shoots and any leaves that were in good condition. Don’t use anything that looks too manky or damaged or you will introduce unwanted nasties into your ferment. I had hoped that I’d be able to use most of the stem, but the bottom parts were too woody.
My test for useability was to cut through the stem. If you can see white pith, then the shoot is likely to be too woody. Take a bite and see what you think. If it’s too tough to eat raw, the ferment isn’t going to help tenderise it a lot. The top, green bendy stems with flower buds and flowers are fine.
After consulting my books I plumped for a 3% brine solution for the ferment. This is 30g of sea salt in 1 litre of water. Only use salt without additives, the table salts etc with additives of iodine and or anti-caking agents can impart an unpleasant taste.
Here’s the quantities that I used, as long as you keep to the same proportions, in particular the strength of the brine, you’ll be fine.
Also, you can use other green veg: kale, sprouting broccoli shoots and leaves, lettuce and chicories, cabbage leaves and foraged leaves too. What else do you think?
You can also add other ingredients to flavour the ferment. Ginger and chilli would be obvious candidates. I like the simple taste for this.
You’ll need a clean container you can cover to ferment the mustard in and some containers to store the completed ferment in the fridge.
Ingredients
500g flexible mustard shoots and leaves
1 small onion, peeled & sliced
30g sea salt or similar
10g sugar (optional)
1 litre of water
Method
Wash the shoots and leaves and dry as well as you can. Excess water can dilute the brine. I pop the mustard in a tea towel, bring the corners together and swing it sharply outside to get rid of the moisture. You can use a salad spinner too.
Take your clean container and layer the shoots, leaves and onion slices in the container, pressing down as you go.
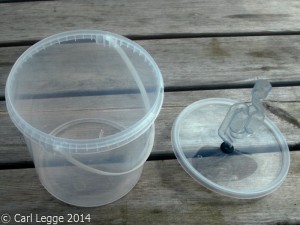
 I use a recycled plastic honey container which I’ve adapted with a grommet and air lock. That’s because I’m like that. You can use what you have, you need to be able to cover the container. A clean cloth is fine. If you use a lid, remember the fermentation will produce gas (CO2) and so this will need to escape periodically.
I then dissolved the salt and sugar in a little boiling water in a jug and topped up with cold water to 1 litre. Our water is fine here, but if you have heavily chlorinated water, then you are best to boil and cool your water first.
Pour the brine over the mustard & onions making sure they are well covered. Use a chopstick or something else just to go round the edge of the container to help release any bubbles of air in the mix. Press down the vegetables so they are under the water. I then put a clean bowl lid on top of the veg with a bag filled with water to weight it down and keep the veg covered. You can improvise with what you have, just make sure whatever you use is clean.
Then pop the container in a sunny windowsill for 3-7 days. Taste after 3 days to see how you like the taste, it will get sharper as they days go on.
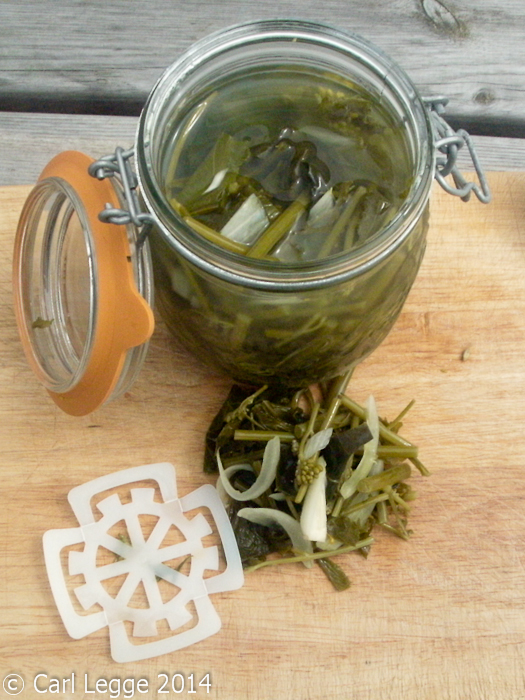
Once you are happy with the taste decant the veg into your clean storage containers and pop into the fridge. The cold will slow the fermentation right down. I use the white plastic discs to keep the ferment under the liquid.
Then use your bounty next to slow roast or red-cooked pork, with salads and antipasti, in sandwiches – you get the idea.
Let me know how you get on and tell me what’s your favourite.
Comments
11 responses to “Mustard greens, fermented and more”
Just planted some mustard greens if all goes to plan will be trying out your fermentation method in a few weeks
What was the original purpose for the white plastic discs? I have been having trouble finding food grade plastic to hold my ferments down. Thanks.
Hi Susan
I originally bought them here for holding down pickles in vinegar. The ‘wings’ flip up and hold under the shoulder of the right sized jar and they come with an applicator.
They came from the Jam Jar Shop here in the UK a few years ago. When I tried to get more last year they did not stock them any more and weren’t very helpful for me to find a new stockist. I traced them to South Africa but have not been able to get any more.
I’ve use the lids from food grade containers before and also cut discs from food grade plastic containers. Boiled stones work well too 🙂
Hope that is of some help
Cheers
Carl
What a fantastic post with such a wealth of information – mustard greens are a fantastic veggie for lowering cholesterol – just as good as kale I think. I am interested in the pesto idea – sounds like it would be delicious and nutritious. Are the end results of the fermented veggies salty to the taste at all? I think I would like them very much if not.
Have a great weekend everybody.
Kate xx
Hi Kate
The finished greens are not very salty to taste. The brine is nor very strong, so I think you’d probably be ok. Make a small batch to see how you like them, it’ll not take long and is very easy.
Glorious day here yesterday and loads done in the garden. Hope your weekend is going well for you and all your boys 🙂
Carl x
This is a very timely post as I have mustard growing wild all over my garden and can’t bring myself to just compost it, but wasn’t quite sure what else to do with it (apart from adding a few leaves to sandwiches).
I’ve tried fermenting various things – unripe sloes were excellent, nettles weren’t good. I have bracken fiddleheads and wild garlic leaves on the go at the moment. I’ve had problems with veg floating to the top and going mouldy before. I now have some (washed and boiled) beach pebbles holding things down, as well as an airlock, but I’m playing safe and leaving it until the fermentation’s finished before opening to see how it tastes. Hopefully once it’s stopped producing bubbles, the veg will stay under the liquid. Of course, I could put it in the fridge, but I’m interested in fermentation as a low tech method of preserving food.
Incidentally, I use ordinary table salt, which doesn’t have iodine but does have an anti-caking agent. This makes the liquid cloudy, but I don’t think it affects the taste (not that I’ve tried sea salt for comparison. You know sea salt isn’t actually pure, don’t you?)
Hi Rachel
Glad to have produced this just in time for you 🙂
Have fun with the fermentation, I think it’s a grand way to preserve and to generate new flavours and textures. Would be especially interested how the fiddleheads go for you.
The salt is interesting. I always use just sea salt here. So I’ve taken the warnings about salt with human introduced additives from the books I’ve read. You personal experience is interesting and well worth adding to this thread for others readers to consider. I know that sea salt is not pure NaCl – I meant pure in the sense of no additions from natural – perhaps ‘natural’ would be a better word 😉
I thought it unlikely that you wouldn’t know that sea salt isn’t pure, but a lot of people are confused about this and it’s one of my bug bears. There’s much talk about the terrible additives in manufactured foods, but the other ‘ingredients’ in natural products like sea salt either get completely overlooked, or are just assumed to be good for us. Here’s an analysis shared by someone who strongly believes that they are good for us. Personally, while I wouldn’t be too worried about mercury, uranium or lead in such minute quantities, I wouldn’t be describing them as ‘nutrients’ either. Sorry, rant over, but um, not pure 😉
Hi Rachel
Well thought through and written rants always welcome. I’ve edited my post to make the salt situation clear 🙂
Just reporting back on the fiddleheads, which I tried today. To my great surprise, they taste of nothing! The original flavour has gone, and there’s no lactic acid either. I don’t know what happened there. They definitely looked like they were fermenting – bubbles and everything – but didn’t produce the result I was expecting. I wonder whether bracken has some other kind of bacteria that out-competes lactobacillus.
The ramsons, on the other hand, are fabulous 🙂
Lovely post and thank you for sharing